Automating Game Resolution - PixelDungeon Edition - Phase 1
Hi there! I come this time with a new project, automating the resolution of a game. I’ve been thinking about doing it since I found the game in 2019 for one of the presentations I did about Frida. I was hesitant of doing it because it is complex project, there are lots of things to do, a lot of tests on each step, and long hours of coding and thinking. But after around two years of trying to forget about it, the idea keeps getting in my mind over and over again. So I dediced to give it a try, and so the journey begins…
This is the first post of a series focused on the automation of the resolution of a game with Frida. I’ll try to create a Frida script that will start a game and will play it till it finishes. Finish does not mean winning it necessarily, but getting to the game over state (trying my best to get a script with good results). I will explain later why it is not possible to achieve a 100% winning rate.
I chose Pixel Dungeon for many reasons:
- It is an RPG game, which are my favourite type of games.
- It is open source, so I just have to focus on understanding the code and creating the script rather than reversing the application.
- It is written fully on Java, so it is a good way to practice Frida’s Java API.
Note:This series of posts are not security oriented. I’ll explain how I solved each step of the automation algorithm.
About the game
Pixel Dungeon is a roguelike(1) RPG game, and the objective of the game is go through all the levels of a dungeon. The player can choose between four character classes (Warrior, Mage, Rogue & Huntress), which have different abilities and stats. The character has different stats, a character level and HP. The player looses when the character’s HP gets to 0. In order to level-up the character has to kill monsters that will spawn while the user crawls the dungeon.
The dungeon is divided in levels. Each level is divided in different rooms which are connected through corridors, with stairs to go up and down the dungeon. Each level is generated randomly when the user gets into it. The algorithm assures that there is always an accesible stair to go up and down.
The developer of the game added a mechanics related to food consumption. The character needs to eat food regularly in order to not get to the starving state, where the player will loose 1 HP after he does a couple of steps. Food is rarely scarce, so the player needs to manage all the resources in order to avoid getting to that state. Because of this, the easiest strategies of farming monsters and getting levels won’t work. Also as everything is generated randomnly, the player will not be able to find food to give the character, and they will get to the starving state.
That are the reasons the game is hard to play, and it is impossible to get to a 100% win rate.
(1) From Wikipedia:
Roguelike is a sub-genre of role-playing video games, characterized by random level generation, tile-based graphics and permanent death.
Strategy to solve the game
I’ll use a basic strategy in order to solve this game, which is the one I use in order to play the game as well. It is a greedy strategy:
- get in each level of the dungeon.
- try to go through all the rooms killing all monsters found during the process and getting all the items.
- use food whenever the character is getting in the starved state.
- use health potions whenever the user gets to low levels.
There are multiple upgrades to the strategy, that I will add after I achieve the first iteration of the algorithm.
Pixel Dungeon concepts and internals
Character
The application has the following classes related to the character:
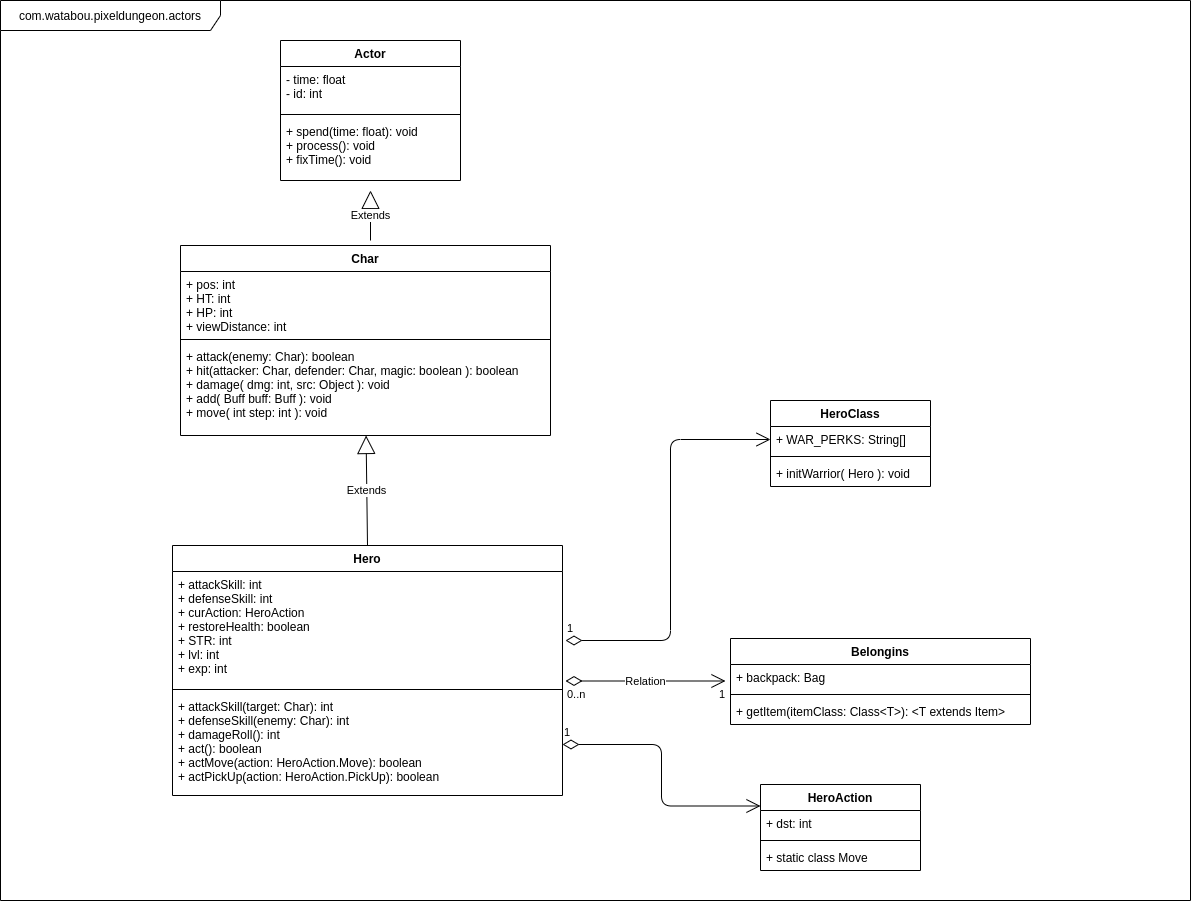
From this class diagram the most important attributes that will be used in the algorithms are:
- Char.pos: position of the character in the map.
- Char.HT: temporary hitpoints. When this value gets to 0 the character dies, finishing the game.
The main stats can be found in the Hero class:
- Hero.attackSkill
- Hero.defenseSkill
- Hero.STR
- Hero.exp
In order to make the characted do things, the application calls the Hero.call() method. This method checks the type of the HeroAction stored in the curAction attribute and then it calls the actXxxx(HeroAction) based on it. As an example if in the curAction the application stored a HeroAction.Move object, whenever the Hero.call() is invoked, the Hero will end up calling the actMove() method, sending as a parameter the HeroAction.Move from the curAction attribute.
As an example, the following code can be used to move a character from one position to another:
function moveCharacter(endPos) {
	Java.perform(function () {

	    Java.choose("com.watabou.pixeldungeon.actors.hero.Hero", {
	        onMatch: function (hero) {
	        	var heroObject = hero;
	        	var moveActionClass = Java.use("com.watabou.pixeldungeon.actors.hero.HeroAction$Move");
				var moveAction = moveActionClass.$new(endPos);
				heroObject.curAction.value = moveAction;
				heroObject.act();
			},
	        onComplete: function () { }
	    });
	});
}
In this case we use the Java.choose API call, because we want the Hero instance created by the application when the game starts.
Level & Map
The following diagram shows the main classes related to the level and map creation and update:
![]()
The map is divided in discrete units of space, that we will call “pixels”. Each pixel has a terrain type (the information about the values are stored in the Terrain class). Each terrain type is associated with an integer value, which can also be seen in the Terrain type. The map is basically a matrix of pixels. In the game this is stored as an array, and whenever the application needs a position, it makes count to convert the array to a matrix. This can be done, because the width of the map is a constant. Each pixel has an id, that is the position of the pixel in the array, which will be used to execute operations and validations during the game lifecycle.
The following image shows the values of the positions in a Room:
![]()
The following script was used to print the positions of the cells:
function printMap(charObj, level) {
    var pos = charObj.pos.value;
    var y = Math.floor(pos / 32);
    var x = pos % 32;
    var RANGE = 6;
    var minY = Math.max(y-RANGE,0);
    var maxY = Math.min(y+RANGE,31);
    var minX = Math.max(x-RANGE,0);
    var maxX = Math.min(x+RANGE,31);
    for (var i = minY; i<= maxY; i++) {
        var line = "";
        for (var j = minX; j < maxX; j++) {
            var posPrint = i * 32 + j;
            //values in Terrain.java
            if (posPrint == pos) {
                line += "* ";
            } else {
                line += posPrint + " ";
            }
        }
        console.log(line);
    }

}


Java.perform(function () {

    Java.choose("com.watabou.pixeldungeon.actors.hero.Hero", {
        onMatch: function (hero) {
        	var heroObject = hero;
        	//cast a Char
            var charClass = Java.use("com.watabou.pixeldungeon.actors.Char");
            var charObj = Java.cast(hero,charClass);

            var Dungeon = Java.use("com.watabou.pixeldungeon.Dungeon");
			var level = Dungeon.level.value;
            printMap(charObj, level);

		},
        onComplete: function () { }
    });
});
The following image shows the values stored in the map attribute for the same Room:
![]()
The only change from the above script was the printMap function:
function printMap(charObj, level) {
    var pos = charObj.pos.value;
    var y = Math.floor(pos / 32);
    var x = pos % 32;
    var RANGE = 6;
    var minY = Math.max(y-RANGE,0);
    var maxY = Math.min(y+RANGE,31);
    var minX = Math.max(x-RANGE,0);
    var maxX = Math.min(x+RANGE,31);

    for (var i = minY; i<= maxY; i++) {
        var line = "";
        for (var j = minX; j < maxX; j++) {
            var posPrint = i * 32 + j;
            //values in Terrain.java
            if (posPrint == pos) {
                line += "* ";
            } else {
                line += level.map.value[posPrint] + " ";
            }
        }
        console.log(line);
    }
}
Another important attribute from the Level class is visited, which has an Array of booleans. This array has one item per pixel, and it stores if the user visited the pixel or not. Visit a pixel means it gets into the field of view of the character.
![]()
In this case the visited = true is mapped to 1 and the visited = false is mapped to 0. The only change from the above script was the printMap function:
function printMap(charObj, level) {
    var pos = charObj.pos.value;
    var y = Math.floor(pos / 32);
    var x = pos % 32;
    var RANGE = 6;
    var minY = Math.max(y-RANGE,0);
    var maxY = Math.min(y+RANGE,31);
    var minX = Math.max(x-RANGE,0);
    var maxX = Math.min(x+RANGE,31);

    for (var i = minY; i<= maxY; i++) {
        var line = "";
        for (var j = minX; j < maxX; j++) {
            var posPrint = i * 32 + j;
            //values in Terrain.java
            if (posPrint == pos) {
                line += "* ";
            } else if (level.visited.value[posPrint]) {
                line += "1 ";
            } else {
                line += "0 ";
            }
        }
        console.log(line);
    }
}
The attribute fieldOfView attribute holds which pixels can be seen by the character. It depends on the place where the user is, the max range of sight (8 pixels), and if there is any object that blocks the sight (like a wall or a closed door). This attribute is reloaded each time the character moves.
![]()
In this case the visible pixels are mapped to 1 and the others are mapped to 0. The only change from the above script was the printMap function:
function printMap(charObj, level) {
    var pos = charObj.pos.value;
    var y = Math.floor(pos / 32);
    var x = pos % 32;
    var RANGE = 6;
    var minY = Math.max(y-RANGE,0);
    var maxY = Math.min(y+RANGE,31);
    var minX = Math.max(x-RANGE,0);
    var maxX = Math.min(x+RANGE,31);

    for (var i = minY; i<= maxY; i++) {
        var line = "";
        for (var j = minX; j < maxX; j++) {
            var posPrint = i * 32 + j;
            //values in Terrain.java
            if (posPrint == pos) {
                line += "* ";
            } else if (level.fieldOfView.value[posPrint]) {
                line += "1 ";
            } else {
                line += "0 ";
            }
        }
        console.log(line);
    }
}
With all this information, in next Phase, I’ll try to generate an algorithm that crawls a level in the dungeon. See you soon!